Kéfir de lait de coco
Notre recette de kéfir au lait de coco contient une petite quantité de sucre pour aider à fermenter le lait de coco en kéfir, mais c'est une excellente option pour ceux qui suivent un régime céto modifié. Utilisez-le comme liquide dans une céréale à base de noix de coco composée de flocons de noix de coco non sucrés, de noix hachées et d'une petite poignée de baies fraîches. Les baies fourniront une petite quantité de glucides, mais elles aideront à équilibrer le repas et à lui donner une texture plus satisfaisante.
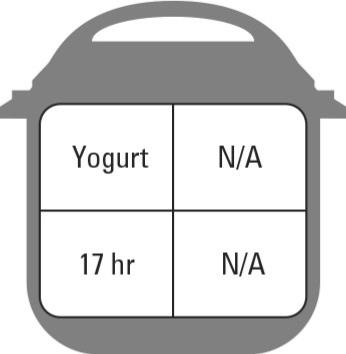
Fonction Instant Pot : Yaourt
Outils spéciaux : thermomètre à lecture instantanée, bocaux de conservation en verre
Convient aux régimes : sans gluten, céto, végétalien, végétarien
Temps de préparation : 5 minutes
Temps de cuisson : 17 heures
Rendement : 9 portions
Ingrédients
Deux boîtes de 13,5 onces de crème de noix de coco non sucrée
2 cuillères à soupe de yaourt à la noix de coco avec des cultures actives vivantes ou 1 capsule (vidée) de poudre de probiotique
2 cuillères à soupe de sirop d'érable
2 cuillères à café de gélatine non aromatisée
instructions
Ajoutez la crème de noix de coco dans l'Instant Pot, fermez le couvercle et appuyez deux fois sur le réglage Yogurt , jusqu'à ce que l'écran affiche Bouillir. Fixez le couvercle.
Lorsque l'Instant Pot émet un bip, retirez le couvercle et vérifiez la température ; il doit lire au moins 180 degrés. Si ce n'est pas le cas, réglez-le sur Sauté et continuez à chauffer jusqu'à ce qu'il atteigne 180 degrés.
Dans votre évier de cuisine, faites un bain de glace qui s'adaptera à votre casserole. Placez le pot dans le bain de glace. Remuer constamment jusqu'à ce que le lait atteigne une température de 105 à 110 degrés. Ajoutez ensuite le yogourt à la noix de coco ou la poudre probiotique, le sirop d'érable et la gélatine. Continuer de fouetter pendant 1 minute.
Essuyez le fond du pot à sec. Remettez-le dans l'Instant Pot et fermez le couvercle.
Appuyez sur le réglage Yogurt , réglez l'heure sur 16 heures et appuyez sur Start.
Lorsque le kéfir est terminé, ajoutez de l'eau bouillante dans les bocaux de stockage. Laissez reposer pendant 5 minutes, puis videz l'eau et laissez les bocaux sécher à l'air. Versez le kéfir dans les bocaux, fermez les couvercles et conservez au réfrigérateur jusqu'à 10 jours ou au congélateur jusqu'à 1 mois.
Plus vous faites fermenter le kéfir longtemps, plus il a de chances d'avoir une consistance fine, semblable à celle du yogourt.
Évitez d'utiliser le miel comme édulcorant. Les bactéries présentes dans le miel entreront en compétition avec les probiotiques.
Incorporer les baies fraîches une fois le kéfir terminé et conserver jusqu'à 3 jours. Si vous préférez un produit plus épais, essayez d'ajouter 1 cuillère à café de farine de tapioca avant de réfrigérer.
Œufs pochés
Si vous êtes un fan d'œufs, vous pourrez toujours en profiter avec le régime céto ! Les œufs sont un choix riche en nutriments qui se marie parfaitement avec certains des légumes à faible teneur en glucides, comme le brocoli, les épinards et les champignons hachés ! Vous pouvez également ajouter du fromage cheddar et de la viande hachée pour un repas plus riche en protéines. Notre recette d'œufs pochés est un excellent point de départ.
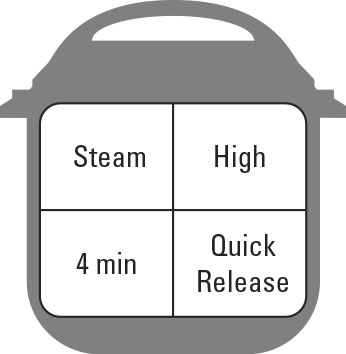
Fonction Instant Pot : vapeur (élevée), libération rapide
Outils spéciaux : Moules à muffins en silicone
Convient aux régimes : sans gluten, céto, méditerranéen, végétarien
Temps de préparation : aucun
Temps de cuisson : 4 minutes
Rendement : 4 portions
Ingrédients
4 gros oeufs
1 tasse d'eau
instructions
Vaporiser 4 moules à muffins en silicone avec un aérosol de cuisson et casser 1 œuf dans chaque porte-moules à muffins.
Placez les moules à muffins sur le dessous de plat. Versez l'eau dans le pot et abaissez doucement le dessous de plat dans le pot. Fixez le couvercle et réglez sur Steam (High). Réglez le temps sur 4 minutes.
Lorsque la cuisson est terminée, appuyez sur Cancel et Quick Release pour ventiler.
À l'aide d'une cuillère, retirez délicatement les œufs de la doublure.
Pour un jaune d'œuf plus ferme, augmentez le temps de cuisson à 5 minutes. Pour un œuf poché plus moelleux, diminuez le temps de cuisson à 3 minutes.
Bouillon d'os de boeuf
Avoid paying the high price for a glorified bone broth at your local market, and make your own in your Instant Pot. Our Beef Bone Broth recipe is an excellent way to bring rich flavor to the low-carbohydrate soups that tend to be prominent on the keto diet. Plus, bone broth is a great source for many vitamins and minerals because of the bone used to flavor the broth.
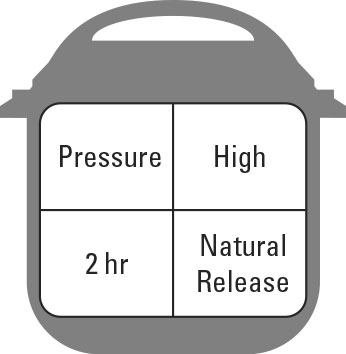
Instant Pot function: Pressure Cook (High), Keep Warm (On), Natural Release
Special tools: Glass storage jars
Fits diets: Gluten-Free, Keto, Mediterranean
Prep time: None
Cook time: 2 hours
Yield: 10 servings
Ingredients
3 pounds beef bones
3 large carrots, chopped
3 celery stalks, chopped
1 large onion, chopped
1/2 teaspoon dried thyme
1/4 cup parsley
1 bay leaf
1/4 teaspoon peppercorns
2-1/2 quarts filtered water
Directions
Combine the bones, carrots, celery, onion, thyme, parsley, bay leaf, and peppercorns in the Instant Pot; then pour the filtered water over the top.
Secure the lid and set to Pressure Cook (High) and Keep Warm (On) or use the Soup/Broth setting. Set the time for 120 minutes using the +/– button and press Start.
When cooking completes, do a Natural Release of the pressure for 30 minutes.
Carefully remove the pot from the Instant Pot with oven mitts. Strain the stock with a colander into a clean bowl, and discard the bones and vegetables. Store in the refrigerator up to 5 days or in the freezer up to 4 months.
You can use onion skins, celery stems, and the tops of celery in stock.
To make a rich and robust beef stock roast the bones in the oven for an hour at 400 degrees.
Beef Bone Broth
Avoid paying the high price for a glorified bone broth at your local market, and make your own in your Instant Pot. Our Beef Bone Broth recipe is an excellent way to bring rich flavor to the low-carbohydrate soups that tend to be prominent on the keto diet. Plus, bone broth is a great source for many vitamins and minerals because of the bone used to flavor the broth.
Instant Pot function: Pressure Cook (High), Keep Warm (On), Natural Release
Special tools: Glass storage jars
Fits diets: Gluten-Free, Keto, Mediterranean
Prep time: None
Cook time: 2 hours
Yield: 10 servings
Ingredients
3 pounds beef bones
3 large carrots, chopped
3 celery stalks, chopped
1 large onion, chopped
1/2 teaspoon dried thyme
1/4 cup parsley
1 bay leaf
1/4 teaspoon peppercorns
2-1/2 quarts filtered water
Directions
Combine the bones, carrots, celery, onion, thyme, parsley, bay leaf, and peppercorns in the Instant Pot; then pour the filtered water over the top.
Secure the lid and set to Pressure Cook (High) and Keep Warm (On) or use the Soup/Broth setting. Set the time for 120 minutes using the +/– button and press Start.
When cooking completes, do a Natural Release of the pressure for 30 minutes.
Carefully remove the pot from the Instant Pot with oven mitts. Strain the stock with a colander into a clean bowl, and discard the bones and vegetables. Store in the refrigerator up to 5 days or in the freezer up to 4 months.
You can use onion skins, celery stems, and the tops of celery in stock.
To make a rich and robust beef stock roast the bones in the oven for an hour at 400 degrees.
Seasoned Pulled Pork
Our Seasoned Pulled Pork recipe is very rich, mainly from the fattier pork shoulder used in the recipe. The recipe suggests pairing this with a simple coleslaw, which traditionally is high in fat from mayonnaise. But if you’re on the keto diet, we recommend pairing this recipe with low-carbohydrate veggies to add more fiber to your diet and prevent some of the unfortunate side effects of a high-fat diet, like constipation.
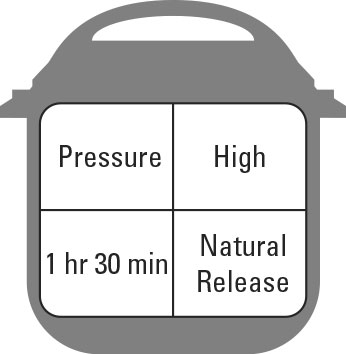
Instant Pot function: Pressure Cook (Normal), Keep Warm (Off), Natural Release
Special tools: Meat thermometer
Fits diets: Gluten Free, Keto
Prep time: 5 minutes
Cook time: 1-1/2 hours
Yield: 12 servings
Ingredients
2 tablespoons blackened seasoning
2 teaspoons garlic powder
1 teaspoon onion powder
1 teaspoon paprika
1/2 teaspoon ground black pepper
1/4 teaspoon salt
4 pounds bone-in pork shoulder
2 cups chicken broth
1 bay leaf
Directions
In a large bowl, mix together the blackened seasoning, garlic powder, onion powder, black pepper, and salt. Add the pork shoulder, and rub the spices into the pork shoulder, covering the entire surface area.
Place the seasoned pork shoulder into the inner pot of the Instant Pot. Top with the remaining spices from the bowl. Pour the chicken broth over the top, add in the bay leaf, and secure the lid.
Set the valve to Sealing and select Pressure Cook (Normal) and Keep Warm (Off), using the +/– button to set the time to 90 minutes.
The final internal temperature of the pork should reach 145 degrees. When cooking completes, do a Natural Release of the pressure for 25 minutes.
Switch the valve to Venting and allow the remaining pressure (if any) to release. Remove the lid and discard the bone, bay leaf, and any excess visible fat from the inner pot.
Using two large forks, begin to shred the pork directly into the broth and spice mixture. Serve immediately.
For a smaller pork shoulder, adjust the time accordingly with the estimate of 22 minutes per pound.
Serve with cabbage slaw on top of a Hawaiian sweet roll or on its own over a salad for a keto-friendly option.
Switch up your seasonings and add your favorite spice blend! If you’re using barbecue sauce, wait until the final stages of serving to add.
Carne Guisada
Though Carne Guisada is traditionally served with tortillas, to remain keto compliant you can serve it alongside some butterleaf lettuce or spoon it into a halved avocado. Avocados are a nutrient-rich food that helps to provide satiety alongside the better-for-you fats that aren’t found in meats.
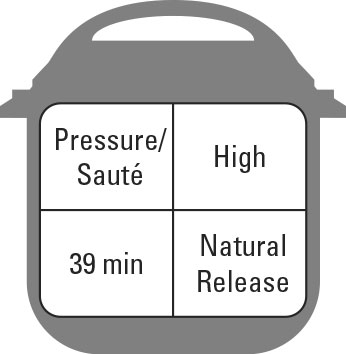
Instant Pot function: Pressure Cook (High), Keep Warm (On), Natural Release, Sauté (High)
Fits diets: Gluten-Free, Keto
Prep time: 10 minutes
Cook time: 39 minutes
Yield: 8 servings
Ingredients
3 pounds beef stew meat, cubed
2 cups beef stock
2 tablespoons tomato paste
1 tablespoon dried oregano
1 teaspoon cumin
4 garlic cloves, chopped
1 large onion, chopped
1 large green bell pepper, chopped
1-1/2 teaspoons salt
2 tablespoons cornstarch
2 tablespoons cold water
Directions
Place the cubed stew meat into the Instant Pot and add the beef stock, tomato paste, oregano, cumin, cloves, onion, bell pepper, and salt. Stir to combine the ingredients, and secure the lid.
Press Pressure Cook (High) on the Instant Pot, adjust the time to 35 minutes using the +/– button, with Keep Warm (On). Do a Natural Release of the pressure for 15 minutes.
Using a slotted spoon, remove the meat to a serving bowl.
In a small bowl, whisk together the cornstarch and water.
Press Sauté (High) and, while whisking, add in the cornstarch slurry. Bring the sauce to a low simmer about 4 minutes; then ladle over the meat and serve.
If you prefer a smoother gravy, use an immersion blender or regular blender to blend the gravy before serving. Work in small batches with a towel over the top of the blender. Serve with flour tortillas or over rice, mashed potatoes, or cauliflower rice.
Korean Beef Bulgogi Bowl
Our Korean Beef Bulgogi Bowl recipe does call for sugar, but to remain keto compliant, you can substitute the brown sugar with stevia or monk fruit. This delicious recipe can certainly fit into your low-carb meal plan when paired with a simple cauliflower rice. Cauliflower rice is a freezer-friendly staple, so you won’t have to spend hours in the kitchen ricing your own.
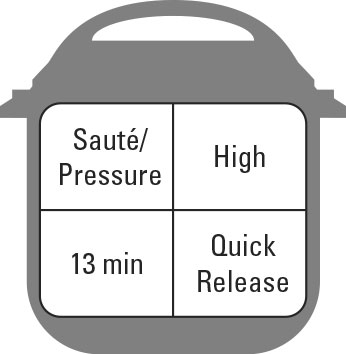
Instant Pot function: Sauté (High), Pressure Cook (High), Keep Warm (Off), Quick Release
Prep time: 5 minutes
Cook time: 13 minutes
Yield: 4 servings
Ingredients
1/3 cup filtered water
1/4 cup low-sodium soy sauce
2 tablespoons rice wine vinegar
2 tablespoons packed brown sugar
2 teaspoons sesame oil
1 teaspoon ground ginger
2 tablespoons cornstarch
1-1/4 pounds lean ground beef
1/2 small onion, chopped
1 teaspoon minced garlic
2 cups chopped bell peppers
2 cups cooked brown rice, divided
2 cups Basic Brown Rice
1 stalk of green onion, chopped, for garnish
1/2 teaspoon red pepper flakes, for garnish
4 teaspoons Sriracha, for garnish
Directions
In a small bowl, whisk together the water, soy sauce, rice wine vinegar, brown sugar, sesame oil, ginger, and cornstarch. Set aside.
Press Sauté (High) on the Instant Pot and add the ground beef. When the beef begins to brown (about 3 minutes), add in the onion, garlic, and bell peppers. Continue to cook for 5 minutes. When finished, press Cancel.
Stir in the sauce and select Pressure Cook (High) and Keep Warm (Off), adjust the timer to 5 minutes using the +/– button, and secure the lid. Ensure the vent is set to Sealing.
When the cooking completes, press Cancel, remove the lid, stir, and portion into 4 bowls, served over 1/2 cup of Brown Jasmine Rice. Garnish as desired with green onion, red pepper flakes, and Sriracha.
To make the recipe keto compliant, substitute a sugar replacement for the brown sugar. Because sugar substitutes are sweeter than sugar, use half the amount. Then serve with cauliflower rice.
Use a tamari sauce in place of soy to make the recipe gluten-free.
Turkey and Mushroom Meatloaf
Nothing is worse than showing up to an event without something to eat! That’s why our prep-ahead Turkey and Mushroom Meatloaf can be a keto follower’s best friend for a weekend away. Going camping? Cook ahead and modify by using an almond flour in place of the breadcrumbs. Reheat to 165 degrees (yes, you can do this over an open flame in the woods), and you’ll have a nourishing meal (not out of a package) in a matter of minutes.
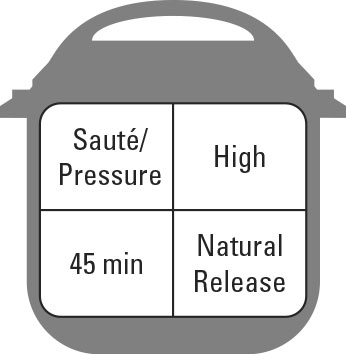
Instant Pot function: Sauté (High), Pressure Cook (High), Keep Warm (Off), Natural Release
Special tools: Three 4-inch loaf pans
Fits diets: Gluten-Free, Keto, Mediterranean
Prep time: 10 minutes
Cook time: 45 minutes
Yield: 6 servings
Ingredients
1 teaspoon extra-virgin olive oil
1/4 small onion, chopped
1 teaspoon minced garlic
3 large white mushrooms, finely diced
1 pound lean ground turkey
1 large egg
1 teaspoon Italian seasoning
1/2 teaspoon ground black pepper
1/8 teaspoon salt
1 tablespoon fresh chopped basil
1/2 cup whole-wheat breadcrumbs
6 tablespoons barbecue sauce
1 cup water
Directions
Press Sauté (High) on the Instant Pot, and place the oil in the inner pot. Add the onion, garlic, and mushrooms. Sauté for 10 minutes, until the mushrooms are tender. Press Cancel.
In a large bowl, combine the mushroom mixture with the ground turkey. Add in the egg, Italian seasoning, pepper, salt, basil, and breadcrumbs. Mix until uniformly combined. Liberally spray three 4-inch aluminum loaf pans with cooking spray. Divide the turkey mixture evenly into the loaf pans and top each loaf with 2 tablespoons of barbecue sauce.
Cover the loaf pans with aluminum foil. Rinse the inner pot and dry the outside. Place the insert back into the Instant Pot, and pour the water in. Position the metal trivet on the bottom and place 2 loaf pans on top; place the remaining loaf pan horizontally across the bottom pans. Close the lid and set to Sealing.
Press Pressure Cook (High) and Keep Warm (Off), and use the +/– button to set the timer to 35 minutes. When cooking completes, do a Natural Release of the pressure for 5 minutes, and then use Quick Release to remove the remaining pressure.
Remove the foil from the loaf pans, slice and serve.
These make an excellent freezer-friendly meal to enjoy later. Just reheat until the internal temperature of the meatloaf is 165 degrees.
Garlic Green Beans and Tomatoes
Green beans are non-starchy vegetables (along with artichokes, bok choy, cabbage, celery, mushrooms, and spinach — think of vegetables that grow aboveground.) Though tomatoes are a bit higher in carbohydrates, when eaten in moderation, they can absolutely fit into a keto diet! Pair our Garlic Green Beans and Tomatoes recipe with any meat, and we promise, you’ll be satiated and satisfied!
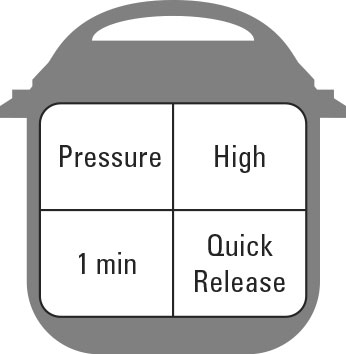
Instant Pot function: Pressure Cook (High), Keep Warm (On), Quick Release
Fits diets: Gluten-Free, Mediterranean, Vegan, Vegetarian
Prep time: 5 minutes
Cook time: 1 minute
Yield: 6 servings
Ingredients
1/2 cup water
1 pound fresh green beans, ends removed
2 cloves garlic, minced
1 lemon, zested and juiced
1/4 cup extra-virgin olive oil
1/2 teaspoon salt
1/4 teaspoon pepper
1/8 teaspoon onion powder
1 small red onion, thinly sliced
1 cup halved cherry tomatoes
Directions
Place the water into the inner pot of the Instant Pot. Add the green beans. Cover with the lid, set the valve to Sealing, and press Pressure Cook (High) and Keep Warm (Off). Adjust the time to 0 minutes using the +/– button.
Meanwhile, in a small bowl, whisk together the garlic, lemon zest, lemon juice, olive oil, salt, pepper, and onion powder.
When the cooking completes, do a Quick Release, and immediately place the green beans in an ice bath for 1 minute. (This helps retain the bright green color and halts the cooking process.)
In a serving bowl, toss the green beans, red onions, and cherry tomatoes together. Drizzle with the dressing, toss, and serve.
Use fresh asparagus instead of green beans for a seasonal twist.
1
Cheese Fondue with Jalapeños
Our Cheese Fondue with Jalapeños is a party-friendly appetizer that you and your friends on the keto bandwagon can enjoy! Serve this recipe alongside celery sticks, cauliflower, radishes, or even rolled meats. Remember, though: This is a pretty high-sodium dish, so be mindful of your portions and drink lots of water.
Instant Pot function: Pressure Cook (High), Keep Warm (Off), Quick Release
Special tools: Instant Pot–friendly casserole dish
Fits diets: Gluten-Free, Keto, Vegetarian
Prep time: 5 minutes
Cook time: 10 minutes
Yield: 8 servings
Ingredients
One 12-ounce can cheese soup
1/2 cup plain Greek yogurt
8 ounces shredded reduced-fat cheddar cheese
One 8-ounce canned diced jalapeño
1/2 teaspoon garlic powder
1 tablespoon yellow mustard
1/2 teaspoon paprika
1/4 teaspoon ground black pepper
1/4 teaspoon salt
1-1/2 cups water
1/4 cup chopped parsley, for garnish
Crusty bread, for serving
Tortilla chips, for serving
Directions
In a medium bowl, mix the cheese soup, yogurt, cheddar cheese, jalapeño, garlic powder, yellow mustard, paprika, pepper, and salt. Pour into an Instant Pot–friendly casserole dish and cover tightly with foil.
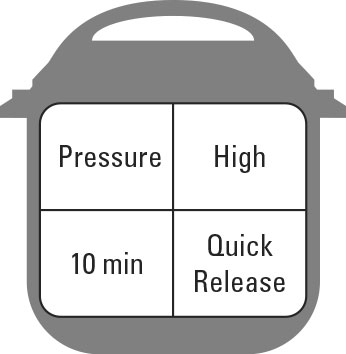
Press Pressure Cook (High) and Keep Warm (Off), and set the timer for 10 minutes using the +/– button.
Add the water to the base of the metal pot insert and place the metal trivet over the water. Position the pan on top of the trivet and secure the lid. Set the valve to Sealing.
When the cooking completes, press Cancel. Use Quick Release to remove the pressure.
Carefully remove the pan from the Instant Pot and discard the foil. Stir the cheese fondue one more time, and garnish with parsley.
Serve with crusty bread or tortilla chips, or use as a topping for tacos, nachos, or burgers.
If you prefer less-spicy foods, you can omit the jalapeños.
1
Spiced Walnuts and Cashews
Need to satisfy a sweet tooth but recognize that keto means saying no to your favorite desserts? Then our Spiced Walnuts and Cashews recipe is a great go-to. Walnuts are rich in omega-3 fatty acids, a heart-healthy fat that has shown to have many promising effects within the body. When preparing this recipe, you can swap the maple with commonly approved sugar substitutes on the keto diet, like stevia, monk fruit, erythritol, or xylitol.
A word of caution, though: If you’re new to sugar substitutes, be mindful of portions and see how your body responds. Some people report tummy troubles upon eating sugar substitutes.
Instant Pot function: Sauté (High), Pressure Cook (High), Keep Warm (Off), Quick Release
Fits diets: Gluten-Free, Keto, Mediterranean, Vegan, Vegetarian
Prep time: None
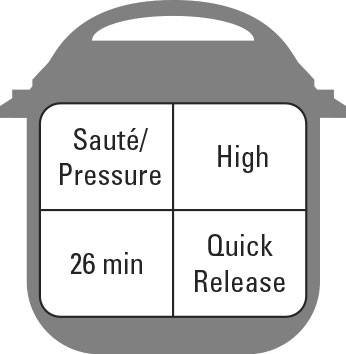
Temps de cuisson : 26 minutes
Rendement : 12 portions
Ingrédients
1/4 tasse de sirop d'érable pur
1 cuillère à café d'extrait de vanille
1 cuillère à café de cannelle moulue
1 cuillère à café de curcuma moulu
1/2 cuillère à café de muscade moulue
1/4 cuillère à café de poivre de cayenne
2 tasses de moitiés de noix, crues
1 tasse de noix de cajou, crues
1/3 tasse d'eau
1/2 tasse de canneberges séchées
2 cuillères à soupe de graines de sésame
1/2 cuillère à café de sel
instructions
Appuyez sur Sauté (élevé) sur l'Instant Pot. Dans la casserole en métal, ajoutez le sirop d'érable, la vanille, la cannelle, le curcuma, la muscade et le poivre. Remuer et ajouter lentement les noix et les noix de cajou, et cuire pendant environ 4 minutes.
Appuyez sur Annuler . Ajouter l'eau, mélanger et fermer le couvercle. Réglez la vanne sur Sealing, appuyez sur Pressure Cook (High ) et Keep Warm (Off), et réglez la minuterie sur 8 minutes à l'aide du bouton +/–. Pendant ce temps, préchauffer le four à 300 degrés.
Une fois la cuisson terminée, appuyez sur Annuler et utilisez la fonction Quick Release pour supprimer la pression.
Tapisser une plaque à pâtisserie à rebords de papier parchemin et vaporiser d'un enduit à cuisson. Ajouter les canneberges, les graines de sésame et le sel dans la casserole et mélanger avec les noix.
Étaler le mélange de noix sur la plaque à pâtisserie. Mettez au four et faites cuire pendant 8 minutes, remuez, puis faites cuire les 6 minutes restantes. Sortir du four et laisser refroidir 10 minutes. Servir.
Pour rendre cette recette conforme au céto, utilisez 2 à 3 gouttes d'extrait de fruit de moine ou de stévia à la place du sirop d'érable pur.
Achetez des noix brutes dans les bacs en vrac et conservez-les au congélateur pour une fraîcheur optimale.
Utilisez des amandes et des pacanes pour les noix et remplacez les canneberges par des morceaux de mangue séchée.


